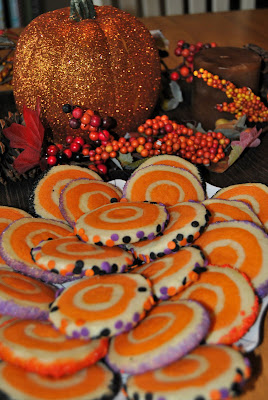
I love Halloween. Not the terror-seeking, horror movie-watching, lose-sleep-at-night type of Halloween, but the kid-friendly kind. Some of my best Halloweens over the years involved dressing up as Tinker Bell at our elementary school parade, running through corn mazes, and spending evenings splurging on chips and cheese dip while watching Halloween-themed movies with a best friend.
This year, I used the holiday as an opportunity to experiment with icebox cookie dough. This buttery dough is a great alternative to the standard sugar cookie and involves less "active" baking/decorating time! Plus, the shaping and pattern methods are endless, and you can transform these cookies into a festive treat for any season.
And... they are delish!
So let me show you!
There are a ton of icebox cookie dough recipes out there. I used the classic recipe from a great cookie book called
Cookie Swap. This book has lots of great ideas for all seasons!
First, you'll want to get all your yummy ingredients out. Here's what you'll need:
2.5 cups all-purpose flour
1/2 tsp. baking soda
1/4 tsp. salt
1 cup unsalted butter, softened
1 1/4 cups sifted powdered sugar
1/4 cup plus 2 Tbs. granulated sugar
1 large egg
3/4 tsp. pure vanilla extract (or add your own flavorings!)
Mix the first 3 ingredients together in a small bowl.
Next, use your electric mixer (if you have one) and mix together the butter, powdered sugar, and granulated sugar. Start the mixer on a low speed to avoid fluffing powdered sugar all over your kitchen. This happens all the time - I know from experience!
Once mixed, gradually add your flour mixture just until the ingredients are incorporated. It should look similar to this:
Now that your dough is mixed, divide it into two equal portions. Decide which color you would like to incorporate, and use it to color one portion of the dough. I used orange, but I think any color would be great. This is where you can really start to personalize your cookies!
Flatten each ball of dough into a disk. Wrap each of them separately in plastic wrap, and place them in the refrigerator to chill for approximately two hours. (This is the part where you pop Harry Potter into the dvd player and relax!)
Right before you take your dough out of the fridge, you'll need to make some egg wash. To do this, you'll need one large egg white and two teaspoons of water. Simply beat the two ingredients together in a small bowl.
Now, place your chilled dough on a lightly floured surface to be shaped. There are numerous ways to shape your dough, but I'll show you how I did mine.
Start by taking part of your dyed dough and form it into a log. Mine was approximately 8" long. Make it as even as possible, because this will help develop the pattern more successfully. Brush your log with the egg wash, so that the next layer of dough will adhere.
Next, use the white portion of the dough to roll out a rectangle long enough to wrap the first log in. This will create the second ring of your cookies.
(This is also where you begin to witness what a messy baker I am!)
Continue this process until you have approximately 4 layers, or until you run out of dough. Make sure you use your egg wash every time you add a new layer.
Once the log is complete, wrap it tightly in plastic wrap and place it back into the refrigerator for two more hours. (Another Potter, anyone?)
Now that your dough has chilled for the second time, it is ready to be sliced. I chose a sharper knife for this task to make a cleaner cut.
Finally... sprinkles! Use your egg wash on the edges of each cookie slice as "glue" for the sprinkles. I chose a variety of sprinkles and all worked well!
Place your cookies on a cookie sheet. Preferably, cover your cookie sheet with parchment paper to avoid sticking.
Bake at 375 degrees for 7-10 minutes. The thicker your slices, the longer the baking time. When the cookies begin to brown on the bottom, they are finished!
Happy Halloween, everyone!


